The SC self-rotating surface cleaning tool is the hot-sale product in our products list. It has the powerful spraying performance and easy service features, its stable working cleaning is welcomed by our customers, and the following is the manual for service and maintenance works.
SC SELF-ROTATING SURFACE CLEANING TOOL MANUAL
SC self-rotating surface cleaning tool rated up to 2800bar applies in industrial equipment surface preparation, ship hull rust and paint removal. It has advantages of simple inner structure and easy maintenance and low usage costs.
Technical Parameters:
✷Max Operating Pressure: 2800bar
✷Flow Rate: 15-38L/M
✷Speed Range: 1200-2600 rpm
✷Outer Diameter: 48mm
✷Length: 205mm
✷Assembly Weight: 1.3kgs (aluminum alloy shroud)
✷Connection Screw: 1-1/8 UNF
✷Nozzle Thread & quantity: 7/16 & 4pcs
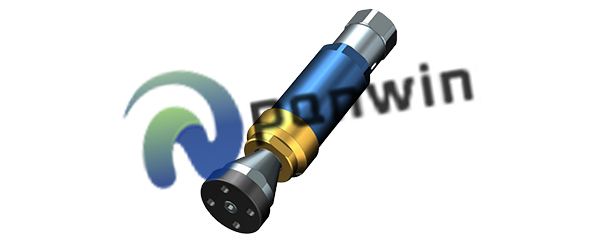
SC SELF-ROTATING SURFACE CLEANING TOOL INSTALLATION
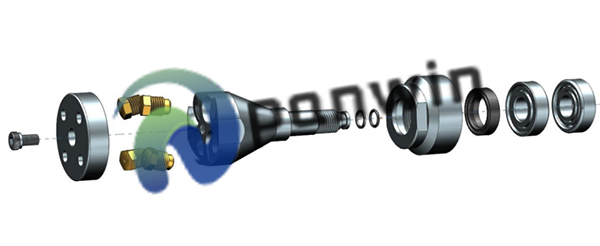
1. Assemble retaining ring and O-ring to rotating head, be careful with the assembly sequences.
2. Assemble the cartridge properly to the outer screw, be careful with the assembly direction.
3. Assemble the outer screw properly to the rotating head, assemble two angular contact bearings to the rotating head, be careful with the assembly direction.
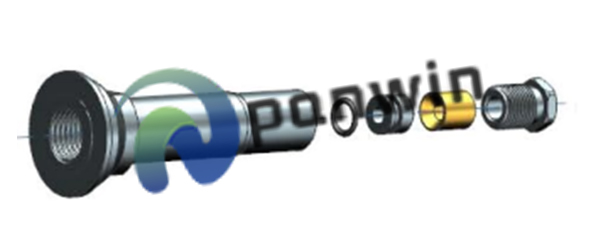
4. 4 Assemble the high pressure seal kit and brass retainer to the rear inner bore of the rotating bearing, be careful with the assembly direction. (see the photo). Fasten the gland nut, be careful that it can not be fastened too tight, make sure the pin can get through and rotate easily.
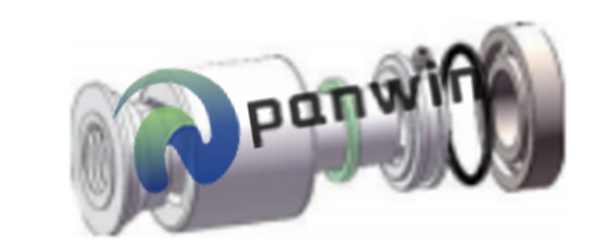
5. Assemble the rotating bearing and rotating head properly with wrench. Assemble magnetic reducer, speed controller, locking ring to the rotating bearing, fasten the locking ring and then assemble the O-ring, then assemble deep groove ball bearing. Both sides are OK.
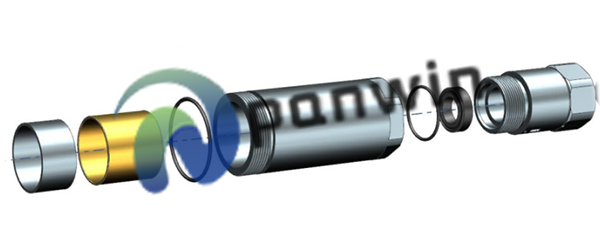
6. Get the rotating shroud out and put the cartridge first and make sure it is in the right direction, then assemble the stainless steel bushing, then the brass bushing. Assemble the rotating shroud to the rotating bearing, make sure the outer screw and the thread of the rotating shroud fit well and then fasten them tight with wrench.
7. Assemble the O ring and seal to jetting nozzle.
8. Assemble the seal and O ring on the connection seal.
9. Insert the assembled jetting nozzle (Step 7) and the assembled connecting seat(Step 8) inside the fasten seat in turn. Then install the assembled fasten seat into the hole at the end of the jetting cover and then install the large O-ring.
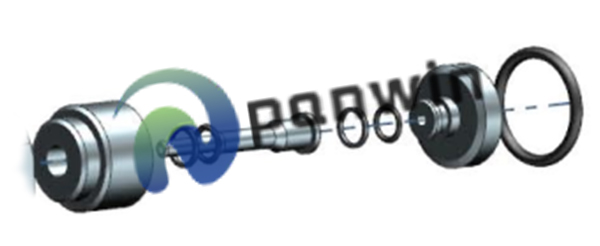
10. Assemble the nozzle in the 4 holes of swivel head, then tighten them with a wrench.
11. Assemble the jetting cover then tighten the screw on cover.
Assembly of SC ROTATING SURFACE CLEANING TOOL is finalized.
■Speed Control:
Factory setting is the medium speed rotation mode, the highest speed mode is 20, 21 position interchange, and the slow speed adjustment mode is based on the original factory medium speed mode, adjust 17 to the front inner groove of 16.
■Replacement method of wearing parts
Common parts are jetting nozzle 32, O ring 13, retainer 15, HP seal 14.
Factory gen
Analysis of common faults
1. The swivel head can not rotate.
Reasons:
1). The high pressure seal is stuck.
2). Internal bearing damage
3). Nozzle is blocked or the nozzle aperture size is worn inconsistent.
2. Working pressure drops;
1). the nozzle is damaged.
2). The high pressure seal is worn.
3). O-ring, flat pad damaged.
Safety precautions:
1. The operator should wear the labor protection equipment correctly!
2. Operators should be trained in professional knowledge and familiar with the potential dangers (cutting force, recoil force, etc.) of high-pressure water jet cleaning!
3. If the fault is found during work, it is necessary to relieve pressure, check and maintain after shutdown!
SC SELF-ROTATING SURFACE CLEANING TOOL DISASSEMBLY
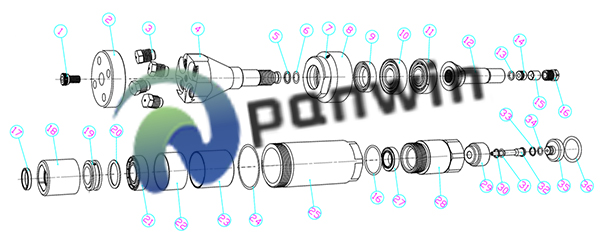
1. SCREW
2. SHIELD
3. NOZZLE
4. SWIVEL HEAD
5. FLAT WASHER
6. O-RING
7. OIL FILLER HOLE
8. CAP
9. OIL SEAL
10. BEARING
11. BEARING
12. ROTATING SHAFT
13. O-RING
14. HP SEAL
15. RETAINER
16. GLAND NUT
17. SPEED-ADJUSTING RING
18. MAGNETIC REDUCER
19. RETAINING RING
20. O-RING
21. BEARING
22. STAINLESS STEEL SLEEVE
23. SLEEVE
24. O-RING
25. BODY
26. O RING
27. OIL SEAL
28. INLET SEAT
29. RETAINER SEAT
30. FLAT WASHER
31. O-RING
32. GUN PIN
33. FLAT WASHER
34. O-RING
35. CONNECTING SEAT
36. O-RING

 English
 Español
 Português
 русский
 français
 日本語
日本語 Deutsch
 Tiếng Việt
 Italiano
 Nederlands
 ไทย
ไทย Polski
 한국어
한국어 Svenska
 magyar
 Malay
Malay বাংলা
বাংলা Dansk
Dansk Suomi
Suomi हिन्दी
 Pilipino
 Türk
Türk Gaeilge
 عربى
عربى Indonesia
 norsk
norsk اردو
اردو čeština
 Ελληνικά
 Українська
 Javanese
 فارسی
فارسی தமிழ்
தமிழ் తెలుగు
 नेपाली
 Burmese
 български
 ລາວ
ລາວ Latine
 Қазақ
Қазақ Euskal
 Azərbaycan
 slovenský
 Македонски
 Lietuvos
 Eesti Keel
 Română
 Slovenski
 मराठी
मराठी Српски
 简体中文
简体中文 Esperanto
 Afrikaans
 Català
 עִברִית
 Cymraeg
 Galego
 繁体中文
繁体中文 Latvietis
 icelandic
 יידיש
יידיש Беларус
 Hrvatski
 Kreyòl ayisyen
 Shqiptar
 Malti
Malti lugha ya Kiswahili
 አማርኛ
አማርኛ Bosanski
 Frysk
Frysk ជនជាតិខ្មែរ
 ქართული
 ગુજરાતી
 Hausa
Hausa Кыргыз тили
 ಕನ್ನಡ
ಕನ್ನಡ Corsa
Corsa Kurdî
Kurdî മലയാളം
 Maori
Maori Монгол хэл
 Hmong
Hmong IsiXhosa
 Zulu
Zulu Punjabi
 پښتو
پښتو Chichewa
 Samoa
Samoa Sesotho
 සිංහල
සිංහල Gàidhlig
 Cebuano
 Somali
 Точик
Точик O'zbek
 Hawaiian
 سنڌي
سنڌي Shinra
 հայերեն
 Igbo
Igbo Sundanese
 Lëtzebuergesch
 Malagasy
 Yoruba


